DNS Filtering - no more ads with Pihole or AdGuard
No more ads - and parental control. Those are two use cases for ad blockers and DNS Filters like AdGuard Home or Pi-hole (R). Privacy and protection of your data in the internet, blocking ads and the use of DNS White Lists or Black Lists.
 Watch the video on YouTube
The main challenge for many people is the integration in the network, i.e. the redirection of DNS traffic to the Pi-hole or AdGuard Home machine. We will have a look into 4 options, using DHCP option 6, the DNS Forwarder option, iptables filter rules on port 53 as well as running AdGuard Home directly on an OpenWrt Router.
Click to view the entire transcript
Hey guys, many thanks for tuning in. Here’s the breakdown of this episode in case you want to skip or fast forward. You can use the video chapters for this. Many thanks.Today we’re going to talk about DNS filtering. And – guys – we will not so much look into how to install or configure PiHole or adguard home – there’s many videos about this – What most people seem to struggle with is rather how to integrate in their networks and where to redirect IP traffic for DNS filtering. We’re going to focus on those. There are many ways to do that.
But first - why would we want to filter DNS? I can mainly see two use cases for this – the first one is removing or at least reducing ads, trackers and cookies. So comfort and privacy really. And the second use case is parental control.
How does that all work? When we browse to a web site like let’s say speedtest.net, then the browser would first query a DNS server (DNS is short for Domain name system) in order to find out what IP address speedtest.net has. It’s kind of like looking up a phone number in a phone book. You know the name and the city of the person you want to call and you can look up the phone number and then dial it. DNS does pretty much the same with IP addresses. Once the browser knows the IP address, it can then make an http or https request to that address and gets back an html document. Inside that document there are usually many other references to other sites or elements, such as text or pictures. But – at the same time – and that concerns the first use case – there are also commercial ad sites embedded. Your browser does the same with every single element in that page, looks it up in DNS and then requests it. Not only does this take time and hence slow down the page but also the result may be that we get a totally ad-overloaded page. But that’s not all. Those sites also send you cookies that are stored in your browser and can be used to track you across the internet. So if I were to browse let’s say the web site of a hotel or airline, then that site would send me a cookie and when I later browse to another site I would then magically get ads for hotels or air line travel. If we don’t want that to happen then we would need to work with a blacklist of sites that we want to filter – those advertising sites are actually quite well known. We could filter the traffic coming from those sites let’s say with a reverse proxy and basically throw it away – or we use a clever approach which DNS filters like PiHole and adguard home are using. That is – whenever a browser does a DNS lookup of one of those blacklisted sites, then we don’t give back the real IP address of that site but rather an address where there is nothing, such as the localhost address 127.0.0.1. The result would be that all those elements – cookies, ads, trackers etc. would either not be delivered to the client or would just be shown as blank spots in the web page. The advantage of using DNS for this is that we wouldn’t request the content and then throw it away but rather never request it in the first place.
In the lights of the second use case – parental control – we would rather work with a white list. That means that if someone browses to let’s say totally-inappropriate-stuff.com (I don’t know if that site actually exists) then we could go through the white list and see if the domain is in there. If it is, OK – go ahead. And if it is not, then we could give back the IP address of a different site such as stuff-appropriate-for-your-age.com or safe-search-engine.com. Again – I don’t know if those exist. I just made them up for the sake of explanation.
So we do know a lot of stuff already. We know what DNS does. We know that we can use whitelisting for parental control or that we can use blacklisting to prevent ads and trackers.
Cool – how can we implement such a solution technically and what are the implications? I want to show you four different ways how you can filter DNS using PiHole or adguard home or basically any other DNS filtering application. Each of these solutions has various advantages, disadvantages and implications. Let’s go through them. If you have OpenWrt then you might prefer Solutions 3 and 4. If you don’t have OpenWrt or the like then you would be limited to Solution 1 and 2.
Just quickly before we do that we need to understand how our workstation or phone or tablet actually knows which DNS server it should use. Basically there are at least two ways we can let a device know about a DNS server. The first way is that we explicitly tell it to use a specific DNS server. In Windows, Linux and MacOS you can specify that on the properties of the network connection. There is a field where you can put in an IP address of a DNS server to use, for example 8.8.8.8 if you want to use google or 1.1.1.1 if you prefer cloudflare or any IP address given to you by your provider.
The second method to tell your device which DNS server to use is DHCP. The DHCP server (that’s usually your router) does not only automatically give out IP and gateway addresses, but there are many other options in DHCP that can be used to tell a DHCP client like my laptop or phone or tablet how to get to certain services. For example we can set the domain name or – you have guessed – the DNS server to use as an option in DHCP. On the client you would just set the DNS server to automatic and it would then honor the suggestion from the DHCP server and use the DNS server that the DHCP server has told it to use.
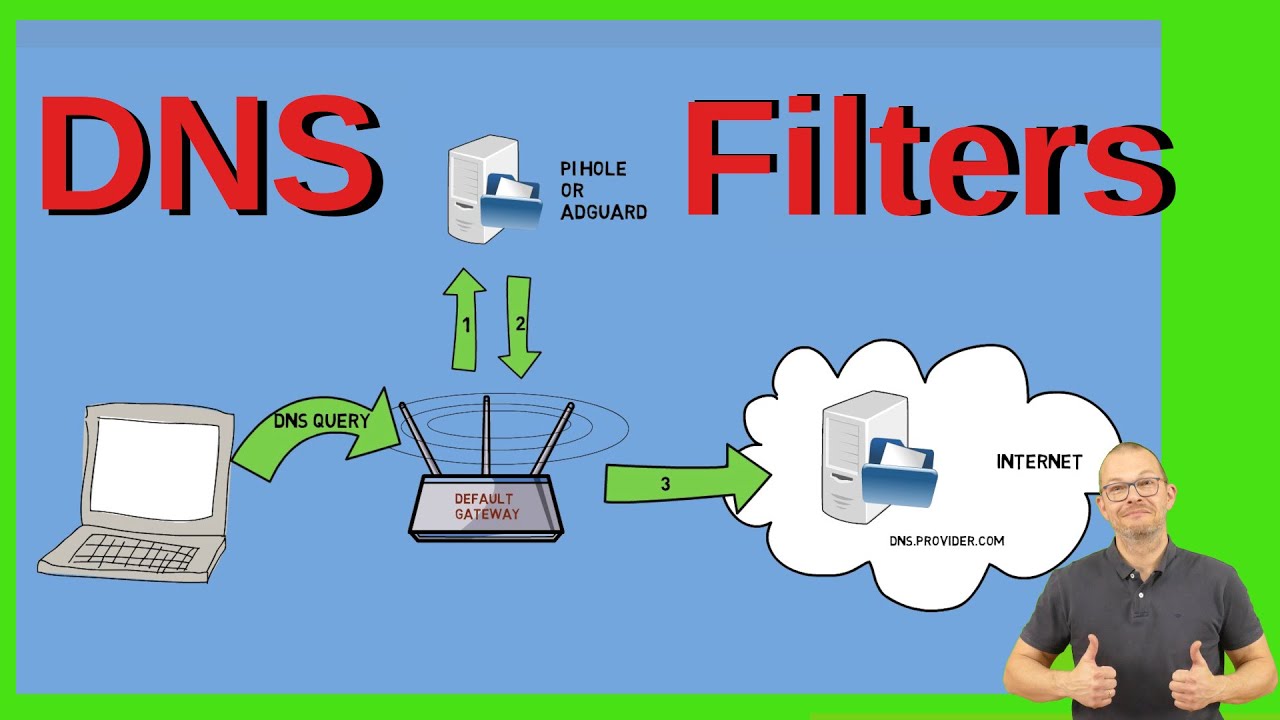
And that leads us to the first implementation option – announcing the DNS server over DHCP. Here’s how things work in a home network without filtering. Your router is connected to your ISP and hence the internet on the WAN side. It requests a public IP V4 and/or IPV6 address from your ISP. It also receives an announcement which DNS server to use. Let’s call it dns.provider.com.
On the LAN side, so inside your home, your router in turn acts as a DHCP server or relay and gives out either private IPv4 addresses – very popular is the 192.168.x range - or private or public IPV6 addresses. And it also usually tells all clients that it is acting at the same time not only as the default gateway to the internet but also as the DNS server. So typically clients would go to that router – the default gateway – and query DNS. The router would then forward that request to the DNS server from the ISP and then send back the result.
This is our first option for a hook into DNS filtering. We would use DHCP to tell the client that it should not use the router as a DNS server anymore but rather a third machine – and that would be of course the Pi Hole or adguard Home server. Once we do this, a client would then still use the router as a gateway but every DNS request would go to that third machine here and from there it would either go back to the router or directly to a DNS Server in the internet. How can we implement this ?
If we have control over the router with a firmware like OpenWrt or pfsense or OPNSense or Mikrotik RouterOS then we can modify that setting for the DNS server to use. On my OpenWrt router I would go to the LAN interface, then the DHCP tab, Advanced settings and here in the DHCP options I would then add a field with option number 6 comma and then the IP address of the DNS server to use. How do I know it’s option number 6 ? Well, first it’s written here in the help text and actually I just googled for DHCP options. That yields many results with documentation on various available options. Once I click on save and apply then every client who requests an IP address would get that information and if its DNS server address is set to automatic actually use it. The IP address that I put in here would then point to a Raspberry Pi running PiHole or a container running adguard home in ProxMox for example.
But what if I don’t have OpenWrt or the like ? What if I have a consumer grade router with stock firmware? Some router firmwares actually give you the possibility to put in some of these options. Let’s check for example the TP-Link firmware. Under DHCP – DHCP settings you can see that I can put in a primary and secondary DNS address. That’s actually setting DHCP option 6.
And what if my router firmware does not allow me to set that option at all ? Well in this case I would use a separate DHCP server. Usually your router acts as the DHCP server, but it doesn’t have to. It could as well be another machine, like a container or VM or another router. So we could switch off the DHCP Server on the internet gateway, your main router, and have another machine announce DHCP.
Whenever a DHCP client is switched on it would broadcast into the network “Hey, is there any DHCP server here? I have a DHCP Request – I want an IP address” Our router would remain silent because we switched that functionality off. The dhcp server container in turn would shout back and say “Yes, I’m here – I have a DHCP offer for you – do you want to accept it?” - The client in turn would accept and the dhcp server would acknowledge and in turn rent or lease an IP address to the client. Alongside with the corresponding options. It might say – “OK – here’s your IP address. It’s going to be 192.168.0.123 – and this is valid for let’s say 12 hours. If you need to renew that lease then come back to me with a renewal request. If you don’t need it any more then please release it so that I can give it to others. And by the way – here’s your default gateway which is 192.168.0.1 – and your DNS server is going to be the PiHole or adguard over here which has the IP address 192.168.0.99”. How can we implement this ?
On most routers you can switch off the DHCP server functionality. Like here again in the TP-Link firmware I can tick the Disable radio button under DHCP Settings. In this old D-Link firmware I would go to Network settings and untick the “Enable DHCP Server” box. Of course I would now need a separate DHCP Server that serves IP addresses in my LAN – if I don’t want to use static IP addresses. Again – that could be a raspberry Pi or even a container – like here in my example I have an LXC container running in ProxMox and I have installed the isc-dhcp software package – that’s a simple dhcp server – and webmin in order to manage it. This container can now act as a DHCP Server and tell all clients that the default gateway is the router, so for example 192.168.0.1 but that the DNS server is our PiHole or Adguard Home instance running on a Pi or in a container. You could of yourse run the DHCP Server on your Pi as well rather than in a container.
Cool – so we have seen that we may use DHCP in order to redirect DNS traffic to a separate device such as a Raspberry Pi or an LXC container running PiHole or adguard home. In order to use this we don’t really need OpenWrt or the like but it can be done with consumer grade routers running stock firmware. On the Adguard home or PiHole Server we would in turn specify the router’s address to be used as upstream dns. Now – this solution has limitations especially when your primary concern is parental control, as we don’t really enforce the use of the suggested DNS server. A client could still configure another DNS server explicitly. I mean – it probably depends on the children’s age. This option is however an easy way to achieve ad filtering. Because in this use case the users would probably be compliant as you are offering real value by freeing them from something they don’t want.
Before we move on, we have a short CALL TO ACTION – I need you to get involved please. I’d love to hear from you if you are using DNS blockers or any other means of filtering or blocking web traffic in any way. Please do share with all of us what your use case is, how long it took you to make it happen, how you went about it and if you are satisfied with the results. Also I’d love to hear from you which software you are using – is it Pi Hole or adguard or something totally different ? Please do leave a comment on youtube. Many thanks guys.
Awesome – I promised you a couple of solutions. So let’s have a look at our second setup option here. We had seen in the chapter before that what the router does when it receives a DNS request is that it forwards the request to the ISP’s DNS server. We may again use this as a hook for DNS filtering. The idea is that we now tell the router to forward DNS requests to the Pi Hole or adguard home server rather than to the ISP’s DNS. A client would hence continue to use the Router as DNS Server and the router in turn would forward that request to the Filtering Machine rather than directly to the ISP.
This can again be done without specific router firmware. In the TP-Link firmware I would go to Network-WAN and tick the box “Use these DNS servers” and again put in the IP address of the DNS filter machine. On the D-Link firmware this option can be reached under Setup – Manual Internet connection setup. And again here you can input a DNS server address. On OpenWrt this is done under Network – DHCP and DNS. Put the IP address of your PiHole or Adguard Home into the DNS forwardings field. On The PiHole / Adguard, we would then however need to specify a public DNS address such as 8.8.8.8 or 1.1.1.1 as the upstream DNS because if we told it to go back to the router we would start an endless loop.
The limitations of this solution are essentially the same like for the first one, that means that there is no real enforcement to use the router as a DNS server. Furthermore this solution has one big disadvantage. In the logs and statistics of your DNS filtering application you would not be able to see which client initiated the request. All requests would rather come from the router. The advantage of this solution is that the router itself would use the filtering machine as a DNS server.
Cool. So now we have seen two options to filter DNS traffic or rather to redirect DNS traffic with a clear focus on the ads prevention and privacy use case. If your main concern is enforcement or preventing leakage then the next solution is for you.
For this solution we do either need control over the router or we need a device in front of the router that can do net filtering. In one of the next episodes I will show how to use arp spoofing to actually redirect IP traffic to a little raspberry pi – so that’s going to be a way to enforce stuff with stock firmware for example. But here let’s focus on a solution using OpenWrt and the built in linux firewall in order to forcefully redirect all DNS traffic to a third device – even if the user had explicitely specified another DNS Server address. A user could hence NOT use any other DNS Server. DNS requests from inside the LAN would ALWAYS gou through the PiHole or adguard.From a networking perspective we can easily identify DNS traffic because it’s UDP or TCP traffic that goes to a well known port number. That’s actually port number 53 for DNS. So all we have to do is redirect traffic going to any address to destination port 53 away to the Pi or container that is filtering DNS. What we want is that anything that comes in to port 53 from any device in the lan and wants to go to any device – be it the local router or 8.8.8.8 or any other DNS server – that this traffic would be redirected to the DNS Filter which is a Pi Hole or adguard Server. The DNS Filter Server in turn should use the router as a DNS upstream and should be allowed to go through to a DNS Server in the internet. In order to implement this, we will use the OpenWrt firewall or rather iptables.
The tricky part is that we have two exceptions. We can’t just divert EVERYTHING querying port 53. The router itself is one exception because it should still be allowed to query DNS from the internet normally. The second exception to the rule is the PiHole / adguard machine because it should be allowed to query the router in turn. For this we need some help. The basic iptables installation on OpenWrt does not give us the option to distinguish between a local ip address and a non-local request. A local address in that context means the address of any interface on the router itself. A non-local address is everything outside the router. For this we need the software module iptables-mod-extra. This provides us with the addrtype module which in turn can distinguish between local and non-local addresses. You can of course install that module in LuCI under System-Software, search for iptables-mod-extra and then click on install or on the command line with opkg install iptables-mod-extra.
Unfortunately there is no possibility to add this firewall rule graphically within LuCI. We need the custom firewall rules here and type in the iptables command by hand. The rule we add is iptables in the nat table – we append a rule to the PREROUTING chain so that it gets executed before anything else and we do want to exclude the PiHole or adguard itself so we say this only triggers when the mac address of the source making the request is not equal to the PiHole/adguard mac address and also it only triggers when the address of the source is NOT a local address. As a result the rule will not trigger for the router itself and it will not trigger for the Pihole /adguard. In all other cases we do a Destination NAT to the Pihole/adguard which can then filter and if need would be relay the filtered request back to the router which would then forward it to the internet. This way local addresses would also be resolved correctly.
In a nutshell this is really only one single line that we need to add into the custom firewall rules here. BUT – we need the iptables extra module here which actually provides us with the necessary addrtype option. Actually we need two lines – one for TCP and one for UDP. In order to activate the rule we need to restart the firewall service. Either in LuCI under system/startup and then click on “Restart” next to the firewall service or in an ssh shell where we can type /etc/init.d/firewall restart. You will find the rule in the description of the video of course.
Let’s see if this works. In my Test sandbox in Proxmox here I have a client machine which in turn uses a router VM on the same Proxmox. There are also two DNS filter containers. One is using PiHole and the other one has adguard home. The firewall rule redirects to the adguard container at the moment.
I open a command line and do an nslookup to an address that is on the ad blocking list. And – surprise – I can see that the redirect is working, but my client does not accept the response. It says that the reply is expected to come from the router but it comes from somewhere else – from adguard home.
That behavior is actually expected and basically a security feature. We get this message because our adguard server is in the same network and the reply does not go through the router. In order to remediate we can do two things. Either we put the adguard or PiHole into a separate network so that it has to route the reply back through the router, or we force it to go through the router by deleting the local network route. Let me show you this. I open a shell on the adguard server, I type ip route to see the routes. The default route goes through the gateway but everything on the local lan does not. If I delete that second route by typing ip route del and then the destination – let’s see what that does – back to my client.
Yep, now the nslookup works and comes back with the 0.0.0.0 address. Even if I try another DNS server – that’s the same result – I can’t go around it. I would need to use a VPN from my workstation to circumvent this.
On the router itself in turn everything works as normal. If I ssh into the router and do the nslookup there everything is OK. The error message at the bottom just means that this address has no entry for IPv6. The IPv4 address resolves normally. If I lookup a legitimate address you can see the difference.
Now let’s see if ad filtering is working. I go into the adguard home console and disable the filtering by clicking on the Disable protection button. Let me open speedtest.net in another tab and refresh - all ad free for the moment, but that’s actually because of my privacy badger over here. Let me deactivate it. Refresh and as you can see I do get a lot of ads here. Now I reactivate the rules in adguard – but I just need to clear the cache of the browser because I have all those nasty tracker cookies - and refresh the browser – there you go – ad free. The page is actually trying to load more stuff but just can’t because of the DNS filter. Using both mechanisms at the same time – privacy plug in such as privacy badger plus DNS ad blocker gives the best results here.
Amazing. We have seen that we can use the router’s firewall to actually forcefully redirect DNS requests to a DNS filter installation. This use case is perfect for parental control and any other use case where you would want to make sure that all DNS requests are filtered such as leakage prevention.
Last but not least let me show you a fourth option – that’s actually the one which I am using at home. My kids are both of legal age so I don’t need parental control here. Furthermore I have a very powerful router here that has a lot of ram and disk so I can actually run adguard home directly on the router itself. The idea is to daisy chain first adguard which will directly answer DNS requests coming from the LAN and then dnsmasq behind which would then chain the request to the ISP if need would be. As DNS answers requests on Port 53, we need to decide which application will be occupying that port. By default, the native DNS server which is dnsmasq listens on port 53 and hence adguard can’t start. So I moved dnsmasq to a different port – I used 5353. Let’s see how to implement this.
Oh - when you do this – please make sure that you are connected to your router using its IP address, not its dns name – because we will be fiddling with DNS and hence you might otherwise lose the connection. Also – dnsmasq acts as the DHCP server – so it might be safer to use a static ip address on your PC while you do this rather than a DHCP address. Also – the order of doing things is quite important here. If you move dnsmasq to a different port before you install the adguard package, then the router would not find the software package server in the internet.
Adguard home is available as a software package in OpenWrt. Just go to system-software and install the adguardhome package. At the moment however adguard home can’t start because port 53 is occupied by dnsmasq.
First let me quickly show the output of netstat – we can nicely see dnsmasq listening on port 53 here. Now let’s move over to LuCI. In order to move dnsmasq to a different port, I need to go to Network – DHCP and DNS – then to the Advanced Settings Tab and down here we have the DNS server port field which I have set to 5353. But you could use any other port that’s not used by anything else. Once I restart dnsmasq I can then run netstat again in order to see the listening port which now has changed to 5353.
Now let me connect to the adguardhome web interface which by default is on port 3000. I work through the wizard. I set the web interface to port 3001 and the dns to port 53 of course. That’s the port where adguardhome will answer requests. Do not set the web interface to port 80 – that’s occupied by LuCi. Otherwise you will not be able to get into the web interface of the router any more. Specify a user and pass and we are good to configure. The adguard home service is now running. It comes up normally because port 53 was free. Here’s the netstat result again which shows the processes listening on these ports. We can see AdguardHome on port 53 and dnsmasq on port 5353.
Next I need to tell adguard home where to find the upstream DNS server which is of course the localhost IP address and then port number 5353. This can be done under settings – DNS settings where I type in the localhost in ipv4 and ipv6 format.
When a DNS request comes in to the router it would now go directly to adguard home, then be daisy chained to dnsmasq running on port 5353 on the same router which would then in turn forward it to the ISPs DNS if need would be. If I wanted to do enforcement then I could of course add a modified version of the firewall rule from Solution 3 – just this time I would redirect to the localhost address rather than to an external address and also I would not have to specify a mac address exception.
Let me check if it is working. Quick nslookup to google. Refresh the dashboard. And yes, the request shows up here. Just something that you need to pay particular attention to when you run AdguardHome on your router. AdguardHome writes all requests into a json file here on the /tmp filesystem. And there is no control over that file filling up the partition. In other words- if you have a lot of DNS queries then this file will grow and can actually cause your router to stop DNS completely. So keep an eye on that.
Awesome – but let’s stop here – this is already a very long video…. hope you liked that episode – if so then a thumbs up is much appreciated. Please do leave me a comment about your DNS filter use case and don’t forget to subscribe – stay safe, stay healthy, bye for now !