Things to consider when running Kali Linux in a VM
Installing Kali inside a VM is easy - where things become interesting is when we want to chose the right solution and the right network setup for tools such as wireshark or arpspoof. With the virtual network adapters you don’t have direct access to the network hardware. We will have a look at network options with Virtualbox, Hyper-V and Proxmox. I have also compiled a little decision matrix that might help you chose the right solution. We will also have a short look at options how we can map hardware (USB, PCI…) to a virtual machine with the three solutions. #kalilinux #virtualbox #hyperv #proxmox
 Watch the video on YouTube
In the video I am comparing the following platforms:
- Microsoft Hyper-V
- Oracle VirtualBox
- ProxMox VE
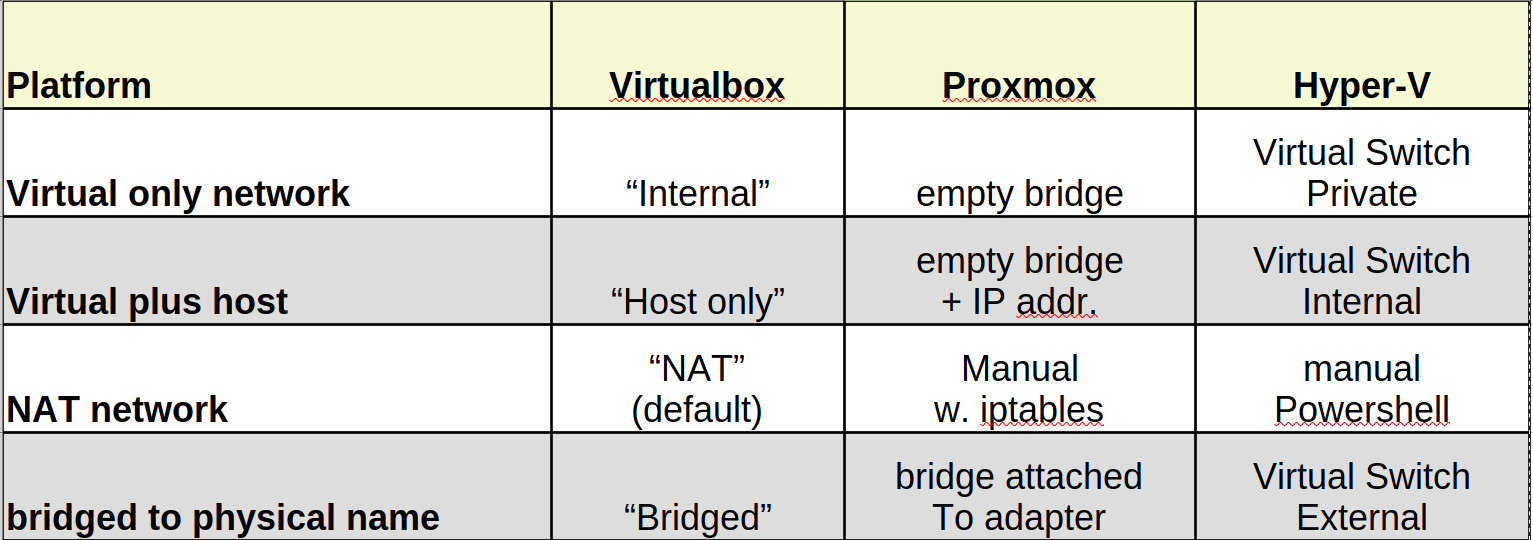
The following decision matrix can help you chose the right one

Which Network to use
There are various networks that you can use and they have different names on different platforms - here’s a short list and how to create them:
Click to view the entire transcript
Welcome to part 2 of this Kali Linux series. Today I do not want to show you guys how to install Kali in a virtual machine, a VM. I am sure most of you know how to do that. If you don’t then please check out this very popular video of fellow YouTuber NetworkChuck. Link up here. I rather want to shed some light on two or three aspects if or when you run Kali in a VM. First the networking options, because that’s what you will need if you want to run tools like wireshark or arpspoof. Plus – I would like to compare different Virtualization solutions, namely Virtualbox, Hyper-V and of course Proxmox. I will explain later why I chose those three. Last but not least we should have a look at Wi-fi options – what can we do in order to access the Wi-fi hardware from within a VM – and is it really necessary or useful. At any time – use the chapters if you’re only interested in a specific part of the video. Also guys – this video does not exclusively apply to Kali but basically to any type of Linux.
(Which platform to use?)
How can we make an educated decision which Virtual machine platform to use ? Actually, the limitations of each one will make that decision quite easy. I have compiled a little decision matrix for this. I hope that everything in this matrix is correct. If you spot errors, then please leave a comment and share with all of us. The first question that you may ask is: Do you want to run the VM on your laptop directly or do you want to run it on a different or distant machine. If you wanted to run it on your local machine then see what’s available for your operating system. For Windows you would be limited to Virtualbox, Hyper-V or VMWare Workstation or Player. If you want to run it on a separate machine then you might be interested if you can run it headless, that means if you can run the host without a screen and keyboard attached and access and manage virtual machines using a web browser for example. That would eliminate Virtualbox and VMWare player and Workstation for example. Virt-manager is a Linux app really, that means you can only run it in Linux or if you would want to run it on Windows, then you would need to use WSL2 for example. But I would say it’s rather for pure Linux users really. If you want to plan ahead – you might want to chose one that can actually do a bit more – containers for example. That’s actually one of the reasons why I personally prefer Proxmox. And I should emphasize on the fact that if you can’t run it on Windows, that does not mean that you can’t manage and access it from Windows. We will see how to run Kali Linux in containers such as Docker or LXC in episodes 4 and 5.
If you are working for a larger company then you might say – Marc, your comparison is totally missing the market reality. Yes – you are right. I’d estimate that 75% or so of the larger companies are using VMWare vsphere, so esxi and vcenter. But – hobbyists, and maybe even small and medium sized companies, freelancers etc. have different needs. The size of the budget is not the same and also the requirements are not the same. Why do I include Hyper-V in this episode then ? It seems to me that Microsoft want to move away from offering Hyper-V as a free server solution like they did with Hyper-V server. They seem to focus on cloud technologies and basically want you to use Azure stack instead. However – with the Pro versions of Windows 10 and 11 you get Hyper-V for free. Even if you would be using Virtualbox as a solution, then Virtualbox would have to use Microsoft Hyper-V as a hypervisor. Why ? Because Microsoft said so. Guys, I don’t want to get into a discussion on whether that is a good or a bad thing – there are arguments for and against it. At the moment it’s a fact. Just – if you have Windows 10 or 11 Pro, then you get Hyper-V for free. You might hence as well use it. That’s pretty much it. You may also ask – why am I not talking about the free VMWare esxi version ? It’s true – you may use that as well – and if you are a VMWare admin at work then most probably you are already using it. The decisive arguments that made me prefer Proxmox is that it is open source and has a really good interface for containers.
Awesome – at this point we already know how to base our decision which platform to use on facts and requirements.
(Installation procedure at a glance)
The installation of Kali follows pretty much the same procedure on all of these solutions. You need an ISO installation file which you then provide to the new VM as a virtual CD or DVD drive. You then boot the VM from that virtual DVD and install Kali on the virtual disk that you have created for your VM. That virtual Disk is basically a file that contains the whole Partition scheme and file systems of the VM. During the creation of the VM you can define additional options with regards to the virtual hardware that the VM should be using. So as I said – quite similar on all of these platforms. Just don’t forget to unmount the ISO image once you’re done installing. Otherwise the installation procedure would start over and over again each time you boot the VM. Alternatively you can download ready made images for VMWare or Virtualbox from kali.org – those contain a fully loaded Disk image plus some configuration data in a so called Open Virtual Appliance file, OVA. You can import that directly into let’s say Virtualbox but also into many other VM platforms. The OVA file is just a compressed file that contains the disk image and a manifest. Just a quick tip here: When I imported the OVA from Virtualbox, it threw an error message in the end. Opening it from Explorer with a right click – open with Virtualbox manager worked fine.
Where things become interesting is when we look at the different types of networks and network adapters that we can hook up to our VM.
(Network options)
The network adapter of our host – that’s the machine our VM is running on – is visible in the real world. Obviously. Because it is real. The VM that is running on that host however has its own virtual network adapter. Some of the VM solutions by default hook this up to a separate virtual network that only exists on the host. In order to give the VM internet access, some solutions actually NAT and masquerade between the virtual and physical network. That means that you can browse the internet without any problems from within the VM, but if you want to do other things such as access the VM from the outside world or analyze network packets in the real world, for example with Wireshark, or if you want to spoof arp addresses, then you can’t do that. You would need to tell the VM software to actually bridge your physical and your virtual network together on ISO layer two. This can be done with all of the suggested products. Just – they are more or less flexible plus the networks have different names – that regularly causes confusion. So let’s shed some light on this here.
In essence we might want to have three or maybe four network types. The first type could be called Virtual only. That would be a network that’s solely visible in the virtual world and not even visible by the host. On Virtualbox that is called “Internal”. On Proxmox you would just create a bridge without a device. On Hyper-V you would go to the Virtual Switch manager and use the Private Network.
The next type is similar to the first type but includes the host as well. On Virtual Box this is called “Host Only” network, on Hyper-V that would be the “Internal Network”. On Proxmox again it’s just a bridge like before but this time you give the bridge an IP address.
The third type is NAT – basically you are hidden behind the host in a separate private network. That’s the default on Virtualbox. On all other solutions you need to create that manually. On Proxmox with iptables and on hyper-v with a Powershell command.
Last but not least we might want to have a network with full physical access. On Virtualbox that’s the “bridged” network. On Proxmox you would again create a bridge and just attach it to a physical adapter. On Hyper-V again you create a virtual switch and attach it to an external adapter.
I have made a couple of videos where we actually use different types of virtual networks. One for Virtual box which is called Virtual Home network and one for Proxmox for the MPTCP test lab. Check them out, the links are in the upper right corner again.
(Hardware mapping)
Right – so much for networking. Now let’s have a look at hardware mapping. There are some use cases where we might want to map hardware from the host to the VM. The most interesting one for us would be passing through the Wi-fi hardware for the aircrack-ng suite or reaver for example. Now – before we look at options for pass through you might also consider an alternate setup. If you look at a typical Wi-fi aircrack scenario then all you would need Wi-fi hardware for is the potential deauth and then the handshake capture part with for example airodump-ng. All other steps such as aircrack-ng itself can run offline on the collected data. When I want to check if my Wi-fi has vulnerabilities then I actually run airodump or aireplay directly on one of my Wi-fi routers. Under OpenWrt you can actually install the aircrack-ng suite as a software package. A small Raspberry Pi would do the trick as well. So what I am saying is that rather than having Wi-Fi hardware mapped from your VM host to your Kali GUI installation you might consider having a 20 bucks Wifi router or a Pi, Orange Pi or the like with a USB Wifi attached running a simple ssh interface. Just saying. You will need Wi-fi hardware that supports monitoring mode anyhow.
So – what are our options if we want to pass through hardware ? You might want to pass through a USB device or maybe a PCI device. On Proxmox you can do both. On Virtualbox you can only pass through USB devices. Hyper-V needs a Windows Server version in order to support Direct Device Assignment (DDA) as it’s called at Microsoft. So you can’t really do that on your Workstation. When you pass through hardware on any of the other two solutions then you would however need to be sure that the device that you are passing through to the VM is not used by the host. So if you want to use your Wi-fi on the host then you can’t pass it through to the VM. A special use case of PCI pass through would for example be GPU pass through. Some of the brute force cracking tools have GPU support. You can’t do that on your Workstation unless you had a second graphics card, but you can nicely do it on Proxmox.
(Console access)
Last but not least let’s talk quickly about the console. That means – how do I actually access the graphical user interface, the GUI from my workstation? With Virtualbox you can provide a number of different Graphics hardware to the VM and basically view it using Virtualbox itself. That’s actually the easiest way of running a graphical VM directly on your Workstation. With Hyper-V you can connect to a local or remote VM using the Hyper-V Manager. That actually spawns an RDP-like session to the virtual machine. That means the VM can be local but doesn’t have to – it could run on a different machine as well. Proxmox uses qemu under the hood which in turn includes display emulation with VNC. Proxmox therefore has NoVNC integrated into its web console. You may as well use Spice. Spice is actually a quite interesting solution not only for remote viewing but also for remote mapping USB devices from the host to the VM running somewhere else. You may in fact map a USB stick or phone that is connected to your local laptop to a distant VM running Spice. Remarkably stable by the way.
(Conclusion)
Cool – so what’s the conclusion? If you want to run Kali occasionally on your Windows laptop and if you don’t have separate hardware to run it headless, then use Virtualbox. It’s the easiest and cheapest. If you don’t need to map hardware to the VM and if you have Windows 10 or 11 pro then you might consider Hyper-V. But then again - if you don’t need direct access to the network, GPU or Wi-fi, then you would not really need to use a VM at all. WSL2 would do the trick. We’ll do that in the next episode. If you have separate hardware to use where you could run the virtual environment headless, then my favorite is Proxmox. You don’t need juicy hardware for that. An old laptop with a broken display for example will do. It doesn’t need a display anyhow. A great alternative to running Kali on separate hardware headless are containers. I will show you how to run it in Docker in Episode 4 and how to run it in LXC Containers on Proxmox in Episode 5. All with the graphical desktop of course. Very last but by no means least – there is a huge advantage with regards to building test environments when you’re using VMs – and that’s snapshots or Checkpoints like it’s called in Hyper-V. Look at this screen here. I installed Windows 11 in a VM on Proxmox. At some point in time something was not working and I wanted to go back in time. Doing snapshots allows you to do exactly that. Take a snapshot after every single step and if need would be just go back in time and take it from there.
That’s it for today – much much more to come - many thanks for watching, liking the episode on YouTube and subscribing to my channel. Stay safe. Stay healthy, bye for now.